Mealworms are an increasingly popular food for birds, but can be expensive. Learn how to grow your own in this article by Garden BirdWatch participant Colin Ryall.
Mealworms are often provided throughout the year as part of garden bird feeding, but particularly during the breeding season. The problem for many people is the high cost of maintaining a continuous supply for their garden birds.
I have been rearing my own mealworms for years, a real cost-saving practice. However, it must be said that patience is essential as it takes four months or so before your mealworm culture starts to produce a steady and continuous supply of fully grown mealworms. You also need somewhere that is relatively dark and undisturbed, with a steady, moderately warm temperature (ideally around 25°C).
Introducing the mealworm
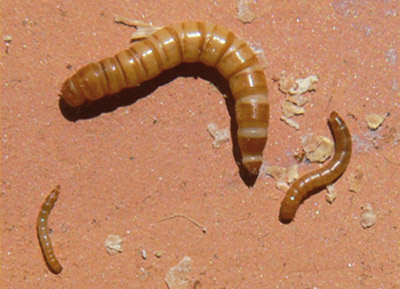
Mealworms are not worms but the larval stage of a beetle. It is the larvae of the Yellow Mealworm Tenebrio molitor that are used widely as food for wild birds, as well as captive birds, reptiles and amphibians.
Another less common but similar species, the Dark Mealworm Tenebrio obscura is sometimes used, the larva being somewhat smaller in size.
Both species are natives of Europe but have long been distributed worldwide, where they occur in undisturbed damp grain and other cereal products.
Mealworms are, however, catholic in their tastes and will also tackle meat scraps and other carrion, feathers and the bodies of dead insects.
Growing your own
 The first thing that you should do is sort out the equipment and other materials that you are going to need as a mealworm ‘farmer’. These are:
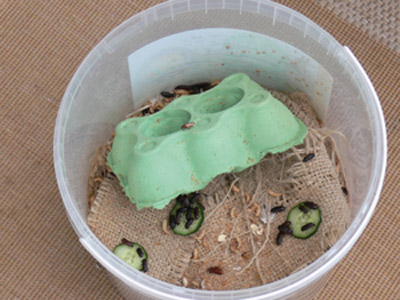
- One, or better still two, containers – e.g. plastic buckets or large round biscuit tins (these should be at least 25cm in diameter and 20cm deep). Make holes in the lid, or make a mesh lid, in order to provide sufficient ventilation for the mealworms
- A bag of wheat bran and/or porridge oats, which provides both bedding and food for your livestock
- Pieces of sacking, broken-up egg cartons or slices of dry bread on which the beetles can clamber and lay their eggs
- Food supplements as available (yeast powder, wheat germ, feathers, dry meat scraps, etc.)
- A suitable source of moisture (for example, slices of apple, carrot, cucumber or courgette)
Put a 2–3cm layer of bran and/or rolled oats into your container, and add say 100 mealworms (which you will need to purchase as your founding stock). Place pieces of sacking, twisted corrugated cardboard, broken -up egg carton or slices of dry bread for the beetles to socialise on.
You will now have to wait for several weeks before the pupae are formed and, subsequently, the beetles. Keep the culture warm (25–30°C) because if it becomes too cold the mealworms will stop growing and breeding, and if they become too hot they will die.
Occasionally provide a source of moisture; carrot slices are ideal, but don’t overdo this as mould might develop and this can be a real problem for the mealworms.
It takes a few months to get a really good and productive mealworm farm going, but I enjoy tending my herd of prize beetles. It is most gratifying in the summer when adding a couple of slices of apple and seeing beetles come running to gather around it like so many mini-buffalos around a waterhole.
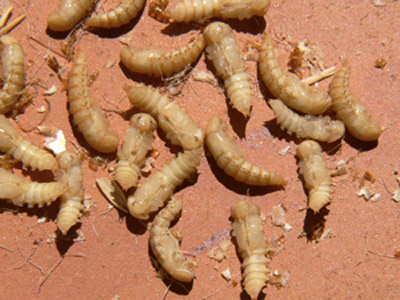
When you reach the stage of harvesting mealworms for the birds, don’t forget to leave some of the larvae to pupate and develop into your future breeding stock.
I use a system of alternating breeding buckets. When your original culture is yielding good numbers of full-sized mealworms, start a second breeding bucket with fresh bedding and sacking/egg carton, and transfer all surviving beetles, any new pupae and some of the largest mealworms to form your future breeding culture.
Leave the bedding in the original stock culture as this will contain eggs, and top up with fresh bran when necessary. This approach means that you do not disturb the breeding beetles every time you harvest some mealworms. If you discover any pupae or newly hatched beetles in the original bucket just drop these into the new breeding culture.
Check cultures regularly to provide food/moisture source and top up with bran if necessary. It is also advisable to sieve old bedding periodically to remove excessive frass but make sure you don’t do this while you still have eggs or very small mealworm larvae in the bedding.
Feeding the birds
Whether you buy your mealworms or grow your own you may, like me, think of them as a luxury bird food, in which case you may not appreciate a full day’s supply being finished off in five minutes or scattered everywhere by the local Magpie.
I’m a big fan of Magpies, unlike many people, but I think they are bright enough to fend for themselves and I have spent time developing a Magpie-proof, albeit rather oversized, mealworm feeder. This has so far attracted Robins, tits, Wrens, Nuthatches and Blackcaps, whilst keeping off the big guys.
My next project is a ground feeder that allows Blackbirds to reach the mealworms, but not the local Magpies.
Article kindly written by Garden BirdWatch participant Colin Ryall. Photographs in the article were taken by Colin.
Buy bird food and feeders from a reputable company
BTO is proud to work in partnership with leading bird-care company Vine House Farm, with the shared aim of making a positive impact for birds.
- Please visit the Vine House Farm website for high-quality foods, feeders, nest boxes, bird houses and more.